Friday, May 11, 2012

Para-Cycling Riding and Racing Resources Links


For new comers to the blog and paracycling; a few links to sites I have found helpful in understanding the world of handcycling and paracycling.

US Handcycling Federation: http://www.ushf.org/ Organization that sponsors races on a national schedule. Got a handcycle? Good. Now join USHF and get training so you can race! 

http://www.howtoadapt.com Practical advice on adapting to SCI (spinal cord injury) with a section devoted to recreational activities including handcycling.

http://www2.teamusa.org/US-Paralympics.aspx News and resources about the world of Paralympics. There is a lot of news in store this Olympic year concluding at London.

For those interested in knowing the details of rules relating to the different classes of paracycling, including classes for handcycles, upright bikes, upright trikes, and blind tandem riders, these are the official rules governing international paracycling race events. It includes information on bike equipment regulations and rider physical classifications:

News of the Shop, Racing and Business

Since becoming a finalist in the Hartford Achieve Without Limits Contest and the start of the 2012 handcycle race season with US Handcycling, the year has been quite busy. For those of you following via Facebook welcome, and thanks to those who participated in the voting process!  To those new to the blog, thanks for visiting, and for those who ride be sure to check out the articles and links on maintenance for paracyclists. This blog will also soon be a venue for announcing some exciting news about the business website, so keep an eye out for it! Link to the Hartford Achieve Facebook page: http://www.facebook.com/TheHartford/app_258066527550278   

Tuesday, January 10, 2012

Paracycling Repair Resources Online

Posting the previous articles has brought to mind the many online resources that this writer has found helpful. Many paras have very customized rides and so finding maintenance information or parts at the LBS (local bike shop) to make repairs can be difficult. If you have not already used the sites listed among the links below, have a visit. You may be surprised at the amount and quality of information that is out there. As with all areas of life, the internet has made for an abundance of information. Oftentimes all you need do is google a part number and you will find your answer.

Handcycle Non-Standardization

As a result of running some very extreme gearing the handcyclist may end up riding with a motley array of hardware: SRAM long cage front/bottom derailleur. A SRAM or Shimano cassette while running a completely customized chainring combo that is shifted with a chainring derailleur actuated directly by a hand operated lever bolted to the derailleur itself. Add to this mix such things as rider dexterity issues or personal preferences that drive the choice of shifters and you have a component stew that can give an inexperienced local LBS "wrench" nightmares!
The typical local mechanic knows very little about such setups and so for the handcycle owner, doing research online about components and setup is key before going to the shop. It may seem odd or even offensive to some riders to tell a mechanic or salesperson what is needed but that is often what is required! However, the better and more experienced local mechanics have usually heard of a handcycle even if they have not worked on one. This blogger knows of a very experienced mechanic working at a national bike store franchise who has done team support for handcycles. It is unusual but once in a while you do find a rare gem of a mechanic. Get to know them, tip them generously when you use their services, as they are sometimes your best resource even if you do your own repairs.


Informative Maintenance Links

The following is a compilation of web resources that have been of help in figuring out service procedures, parts compatibility and adjustment. If any readers have other suggestions I will gladly add them to later edits. Email me at: g_damerow(at)yahoo.com
 
For very helpful, well-illustrated and detailed service procedures on just about every brand and type of bike component out there, Park Tool:

http://www.parktool.com/blog/repair-help

Among the major three, (Shimano, SRAM and Campagnolo) Shimano has the most comprehensive documentation available. Want to know the largest chainring size that will work with that E-type bottom bracket mounted front/bottom derailleur? Google the part number and Shimano will have it.

http://techdocs.shimano.com/techdocs/index.jsp

SRAM also has a support section on their site. Not as comprehensive but still contains useful information.

http://www.sram.com/service/sram/all

For those Campy Cultists there is the very refined looking service section of the Campagnolo website. (Campy Cultists. Uh oh. Here come the comments. A question to ponder: What if Steve Jobs had worked at Campy and not Apple?)

http://www.campagnolo.com/jsp/en/doc/doccatid_1.jsp

By the end of his life, Sheldon Brown was probably so saturated with bike knowledge that he had sprockets where his brain should have been! Sheldon was known for his innovative and non-standard thinking and for using unusual combinations of parts and components. (Example: His his 63 speed bike. http://sheldonbrown.com/otb.html) Such outside-the-sprocket thinking is sometimes just what you are looking for as a para bike mechanic. If you are in need of strange and unique information or tips on unusual components Sheldon's site will probably have it. The site is now maintained and updated by his friends over at Harris Cyclery.

http://www.sheldonbrown.com/


Two other sources of basic information on parts and part compatibility:

http://www.ebay.com

http://www.amazon.com

No, that was not an error! Often sellers will list a part or component by part number reference and to better inform the buyer on compatibility, the seller will list what the component will and will not work with. Not all information is reliable or applicable to some setups but one component listing often leads to another and then you find out the information you need. Ebay has a very good search engine and can oftentimes narrow down the search faster than google alone.

Lastly, I have posted all of the above major links in my "links" box at the upper right side of the blog for future reference.


Thursday, January 5, 2012

The Great Chains of Being


During the last weeks of December 2011 I was a semi-finalist in the Hartford Achieve Without Limits contest. The finalists are to be announced in January 2012. Thanks to all the blog readers who voted!


http://www.facebook.com/TheHartford?sk=app_258066527550278 


Wax-based chain lube, a quick link and a chain tool


The Great Chains of Being
When was the last time you heard another rider bragging about their new chain?
Bicycle chains are usually anonymous. Unnoticed, almost invisible… Until the chain breaks or slips off and then the chain is all you can think about!

Yet, when asked what item he monitored and replaced regularly during the 3000 mile Race Across America, a mechanic answered, "chains." For the regular rider and the avid racer, chains should be looked upon as the oil in an automobile: They should be replaced at regular intervals, as continued use of a worn chain will cause losses of efficiency and reliability.  


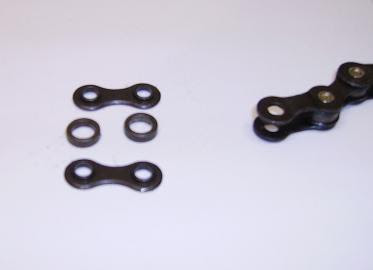
Disassembled inner chain link with rollers
The riveted joint roller chain is a marvelous drive system. Although made of stiff individual links and rollers, the multiplied combination of those rollers and links allows the chain to bend and flex enough so as to allow easy shifting yet be strong and stiff enough to pull cleanly and evenly against the teeth of chainwheel and sprockets. When new, clean and lubed properly a bicycle chain can achieve power transmission efficiencies of 88-99 percent. (Bicycling Science, David Gordon Wilson. 3rd Ed. Pg 342)   


Everything Sags With Age
However, due to wear accumulating at each riveted joint, the whole chain grows longer with usage and drive efficiency suffers. This, "stretch" at each joint will cause the chain to ride unevenly against a sprocket. When observing this unevenness of the chain on a sprocket you will notice that the first and second links mesh properly, but by the time the third, fourth and fifth link follow along and contact their matching teeth they do not seat fully against the teeth. This can lead to premature tooth wear and possible tooth breakage because there are fewer teeth bearing the same amount of power transmitted from the chain. Periodically check your chain and be prepared to replace it at regular intervals.

Also note that with the advent of bike cassettes with more than 8 speeds, that chains have become thinner and thinner to accommodate the increase in the number of sprockets on the cassette. Although the jury is still out on the long term reliability of the newer 9,10 and 11 speed systems it seems to me that the more material you remove from any structure, chains included, is going to reduce it's life span and reliability. (11 Speeds? The rider/engineer in me is shouting, "Now was that really necessary!?" If one day the component makers come out with an 10 speed 11-44 toothed cassette, I might buy into a new chain system to eliminate the front/top derailleur, but until then….)


Be a Chain Tool
The three basic chain tools: (1) Chain Tool (aka chain breaker) such as the Park CT-5 or CT-3. (2) Masterlink pliers such as the Park Tool MLP-1. These will help speed removal of quick links/master links, especially for those with dexterity issues. (3) Chain wear measurement tool such as the simple Park CC-3.2 chain wear indicator will help determine when to replace a chain.


Disclaimer: Although I do like most of the Park Tool product line and use some of their tools I do not use their tools exclusively nor do I receive any compensation from Park. Having personal experience in fields such as automotive, plumbing, small engine, welding and electrical I must say that Park Tool makes a very good tool. Tools by Spin Doctor are an economical choice although the product line is not as broad or as widely available as Park.  


Lube
There are a few opinions about the type of lube to use on a chain. Most chain manufacturers like to ship chains lightly coated in thick paste-like grease. While good at protecting the chain from rust, this factory lube tends to attract and trap dirt and road grime very quickly. This writer prefers a drier wax based lube as it offers the rust protection of grease but does not trap as much dirt. Regardless of your choice of lube, you need to thoroughly clean/cleanse the chain of the old dirt and grease before re-lubing a chain. Chain cleaners, solvents and lubes can be found at your local bike shop. A chain can be cleaned while on the bike but the easiest way to clean and lube a chain will usually be to remove it from the bike to clean it.


Frequent Rider Maintenance Tip:

Having two or three spare clean/lubed chains on hand can simplify chain maintenance: You can remove the old chain from the bike, drop it in a solvent bucket, grab a fresh chain and install it, letting you clean and re-lube the old chain when it is convenient.


New Chain Installation on Upright Bikes
If you have your bike's original chain handy, count the links and then count off the same number on the new chain to break it at the right length. If you do not know the original link count and are not trying to modify the chain length do the following:


The Add Two Links Rule
Wrap the new length of chain around the largest chainwheel and largest cassette sprocket without threading the chain through the cassette derailleur. Add two links to the overall chain length and break the chain.


A quick link/masterlink can be added to complete the final chain installation and will allow for quick chain removal. Note: masterlinks and quick links should also be monitored for wear and replaced at intervals. The easy serviceability of the quick link also means the quick link wears faster.


Chain Length and Handcycles
Compared to a bicycle a handcycle usually has abnormal distances and angles between the cassette and chainwheel as well as an extreme gear ratio range and a long cage style cassette derailleur that rides upside down. The result is that the typical handcycle has a very long chain and a bouncy derailleur.

This extra chain length can allow the chain to bounce a lot on rough pavement and that can sometime contribute to unpredictable shifting or in rare cases allow the cassette derailleur to bounce dangerously downward toward the cassette teeth. This is the nature of the beast and there is not a lot that can be done to overcome the problem. However, a properly fitted chain can keep the chain only as long as it needs yet be long enough to move freely at either extreme of the shifting spectrum.


Measuring to fit a chain to a handcycle is no different than fitting a regular bike and most times the, "add two links" rule holds true. However some handcycle chains may require an adjustment of 1 or 2 links of chain to prevent the cassette derailleur from locking up when you shift the bike to either the two largest or two smallest gears. From riding experience we know that such shift combinations are really rare. But there are those times that you might find yourself hitting a bad series of bumps when you find yourself in your big ring and big cog and suddenly discover that the spokes on your front wheel just ate your shiny new SRAM derailleur! I should know. It once happened to…… a friend of mine. (Cough, cough.)


Long Ride and Racing Tip

The lightest chain related ride insurance for crucial races and road trips is a quick link stashed in an accessible location on the bike. (Under the end-cap of a hand pedal is my preference.) Even if a chain field repair makes your chain a bit shorter than normal and prevents access to some gear combinations, you should be able to make it across the finish line instead of having to hitch a ride home on the sweeper car. For some riders, accessing a chain to make repairs during a ride may be difficult. However it has been my experience that even in the midst of major events there can oftentimes be a bystander or fellow rider nearby more than willing to help with thrown or broken chains.


Wednesday, December 28, 2011

Paracycling Poetry Slam!


Something different and humorous for the update this week: Throwing down the gauntlet in the first Paracycling Poetry Slam/Rap Battle. Tech article on chain maintenance will be along soon.

Speaking of battles, Friday is the last day to vote in the Hartford Achieve Without Limits contest. I would like your vote and also encourage you to vote for Todd J. in health and fitness.

Thanks to good friend, "Ruki" for the poem idea:

“Get a handcycle”

You fixies
You pixies
Who only have one gear
Your skinny jeans
And no helmet
Don’t belong round here

Spandex whiner

Think yo’ the Shizz
Vith dat Carbon vunder bike
Und the dimpled dual Zippzzz?

We got you beat not by one

But by three!
So keep your head up
Lock those brakes up
As you runnin’ into that tree.


Dirt biter
With the fat tire
In hockey pads
With the shocking
Long shocks


Think your back
Takes a beating?
Try rolling with no “cord”
On a downhill at 50
Then you’ll see some bleeding!


And you Tandies
With your twin riders Dandy
Cruising uphill at twenty

Yeah you make it look so easy
With your quad leg power
Now try it with your arms
And you will look really cheesy

So now take a look
Do the double take
At the dude
Cranking the trike
In fast four-four time

Yea, I am cranking with my arms
Up one hill
And down the next

While back at the line you
Wonderin’ if that
New kit your wearing
Makes you look fat

Get a life, get real  
And get a handcycle!

In this sport
There aint no walking
Even if you have
To limp across the line

We’re the cult
Of the upside-down derailleur
With the three carbon discs
And we rule the road

So fuggetabout the fancy jersey
Throw away those little cleats
And the dainty matching shoes
Ride with face so grimy
And for the glory

You only live once
And then are born anew
As the beast
That rides that creature
That has no better

So get a real ride, get a life,  
And get a handbike!

Wednesday, December 21, 2011

The Properly Dressed Cable

From December 14-30, 2011 I am a semi-finalist in the Hartford Achieve Without Limits contest. Enjoy the blog and I would appreciate your repeated votes at the facebook link!


Pictured are the three most vital tools for performing your own cable maintenance: Small needle nose pliers, for holding cable taut when tightening a cable clamp screw. Cable and housing cutting tool, For making clean and easy cuts through cable housing and cables. (Available at local bike shop or online) Metric hex key wrench set, for loosening and tightening derailleur or brake cable clamp screw.


Emergency Repairs on the Road:

In the author's experience, if you add a small adjustable wrench and leave the cable cutter behind, you will have a very effective and compact road tool kit that covers many emergency adjustments or repairs that can happen while on the road. Add a small tire patch kit and mini pump or Co2 for more complete, "insurance." For some paras there is no walking home from a broken down bike!


Cable Types


As already mentioned, there are two kinds of cable available, distinguished primarily by the type of housing used.  1) The cheaper spiral wound looks like a coil spring. 2) "Compressionless" whose housing looks like a bundle of straight hair strands running from housing end to housing end. The better brands of compressionless housing usually have an inner plastic liner that reduces cable friction and helps center the cable in the housing which results in crisper shifting, authoritative braking and smoother cable motion. 


Compressionless housing, top. Spiral wound, bottom.  Plastic coating was removed ONLY to show cable housing innards. Properly cut housing will have plastic outer coating along it's full length. 


Cable Cutting


Cable housing should be cut with shearing type cable cutters designed for the purpose. Use of dykes style cutters or other type of non shearing cutter will result in a very poorly cut housing end, and with compressionless housing, a badly crushed plastic liner. The best brands of cable will not last long if the ends of the cable housing are ragged. In some cases, the cable end might come out ragged even with the cleanest cutting, and a small hand file or rotary cutting tool (Dremel) or small angle grinder can be used to square off the end of the cable housing. Compressionless housing can also require a bit reshaping with the pliers as the cutting will tend to "teardrop" the end of the housing.


Handcycle Cable Housing Hygiene

On handcycles, ragged housing ends can rub on the cable sides and cause premature cable fraying at the barrel adjuster of a shifter or brake and can also cause the cable housing end to cut its way through the cable housing ferrule or end cap. When is doubt make sure the cable housing ends are clean.


Feral Ferrules


Ferrules or cable housing end caps come in a few flavors: 1) Thin pressed sheet metal used with cheaper cable with spiral housing. 2) Thick molded plastic, used on pricier compressionless cable, and, 3) machined aluminum, which can be special ordered. Ask at your local bike shop). The aluminum ferrule can be used on a handcycle where cable flop and cable tension conspire to tear up a conventional plastic ferrule.


Dexterity Issues and Cable Adjustment


Properly adjusted brake and shifter cables can often require the mechanic to actively apply tension to a cable while tightening a clamping bolt and although a needle nose pliers can be handy, oftentimes certain set-ups or the dexterity level of the mechanic may require a third hand. In such situations the BT-2 Cable Stretcher from Park Tool can be useful. Available at local bike shop or online.

Thursday, December 15, 2011

Bike Wrenching for Paracyclists:

To begin, a shout-out to Leon Bostick who suggested a handcycle maintenance class. Leon, thanks for the inspiration and may this blog suffice for now.

Questions, comments and suggestions for further how-to topics can be sent to me at g_damerow(at)yahoo.com 

From December 14-30, 2011 I am a semi-finalist in the Hartford Achieve Without Limits contest. Enjoy the blog and I would appreciate your repeated votes at the facebook link!
http://www.facebook.com/TheHartford?sk=app_284266101605194 

Note: Some maintenance topics will apply to both adaptive and conventional bikes. Those topics that are unique to a given adaptation will be noted.

Handcyclists who are set on doing most or all of their own work, may find it helpful to have a table to set their ride upon to ease access when they work. Something as simple as a sheet of plywood set on saw horses can suffice. Riders of uprights will probably want to invest in a mechanic’s stand to save their knees.


Part 1: Derailleurs, Cables and Shifters

I still remember my first drop handle-bar ten-speed. It was a blue framed Huffy with gumwall blue tires, metallic paint, and as I came to learn, had the weight of an Abrams tank. While the Loti, Cannondales and Schwinns of my cycling club buddies rode flawlessly down the road, I was usually on the curb, putting the thrown chain back on the sprockets and wondering why the bike never shifted right.  I was glad to have the Huffy, but if I knew then what I know now about shifters, cables and derailleurs I would have spent a lot more time riding happily!

A thrown chain can ruin a perfectly good ride, club race or championship winning charge. So what do you have to know to have a reliable shifting bike?

Proper Derailleur Adjustment

(Note: In handcycling the Rear derailleur is known as the Bottom.  The Front derailleur is known as the Top derailleur. Sounds like a description of a game of cricket, no? However, for the discussions here I will refer to a derailleur as a chainwheel derailleur or cassette derailleur)

Make sure the basic derailleur settings are correct. Chainwheel derailleurs and cassettes derailleurs have two stop screws: One screw limits the top position and the other limits the bottom position of the derailleur.

Top Limit Adjustment. Common symptoms of a poorly set top limit screw are a chain that rides over the largest gear and onto the axle or crank. Turn the top screw in until you feel a slight resistance in the shifter when shifting into the largest gear. The resistance indicates that the screw is preventing the derailleur from pushing the chain too far. If you cannot shift fully into the largest gear or the chain will not stay on the large gear but drops down onto the next lowest gear, back the screw off slightly. When possible, shifting adjustments should be made on an indoor trainer when possible to simulate riding conditions.

Bottom Limit Adjustments: Cassette derailleurs that randomly skip the chain on and off the smallest gear or refuse to drop below the second to last gear may require the bottom end set screw backed off slightly. Adjust the screw until the skipping stops and the chain runs noiselessly on the smallest sprocket.

Note: A worn, kinked, mis-routed or badly adjusted shifter cable can also cause skipping on the bottom end, so if backing the screw out all the way does not stop the skipping, inspect the cable then adjust or replace it.

Chainwheel derailleur bottom end stop screw setting: The goal is to have the derailleur pull the chain down to the smallest gear without having it pull the chain off the small sprocket.

Handcyclists: Modern bicycle cabling, even the best and most expensive brands were never designed to survive the abuse that a constantly moving handcycle crank delivers so expect to replace any rotating cables after about 400 miles. Expensive lined compressionless cabling may give crisper shifting and slightly greater durability.


Also keep in mind that if after properly setting the top and bottom screws, replacing the cables and properly adjusting the cable tension, poor shifting symptoms persist, then you may have a bent derailleur bracket or a chainwheel derailleur that is worn out or loose.

Handcycle Racing Tip! Shifters that move with great difficulty indicate worn cables. I recommend  that one or two week prior to the big race that you replace any cable that is showing wear and excessive friction. The remaining training days before the race will allow you literally work out the kinks and find/solve any cable routing issues that may affect your shifting on race day.

“Front Derailleurs operate in defiance of good engineering principles.”  -Theodore Costantino. (Have you ever observed and contemplated the action and motion of a front/top derailleur? Watching the chain move back and forth often makes me a constant skeptic!) Even properly adjusted front/top derailleurs do not like to be shifted while under heavy loads and will often misbehave if you do not let off on the torque and allow them to do their job. When upshifitng, or even downshifting  be sure to lay off the power slightly!

Shifters

Modern index shifting has revolutionized cycling in the same way that electronic shifting is about to change it again once more. Having said that, reliable index shifting depends on a properly adjusted cable and derailleur. On the spot adjustments while on the road can be made with the barrel adjuster on the end of the shifter but when the adjuster reaches it’s limits as the cable stretches it becomes mandatory to re-set the barrel adjuster and adjust the cable.


Handcycle Shifter Cable Maintenance Tip

When routing new cables and housings to handpedal mounted shifters that are tied to and bundled with brake cables be sure that when placing zip ties that the cable housings follow the same arcs. (think of the adjoining cable housings as the multi colored arcs of a rainbow and you will get the picture)  Movable and rotating cable housings that are bundled and zip tied unevenly against neighbor housings will flex in strange ways and put excessive stress on the cables inside when rotated and cause premature cable breakage.


Shifter Preferences

I am not a fan of rotary/twist style mountain bike shifters (There I said it! I feel so much better now!) Twist shifters are simple, you twist to the right gear and the shift happens. Usually. Twist shifters tend to be less tolerant of sloppy and worn cables and so while you may think you have shifted into the right gear you know by the sensations on the cranks that the shift did not happen. The reason I prefer paddle shifters is that most paddle types have a small gap between shift points which allow the rider to go slightly past the intended shift point and so get a balky derailleur into the desired gear. However,  a rider’s hand dexterity may determine the choice of shifter to be a twist. In cases where a twist shifter is required, shifting reliability may increase by the use of compressionless cables housings.  (Sometimes known as “SIS”)